Dec 12, 2017 | DS, Matrix, MLS®, Stats & Technology |
You asked, and we answered! RAHB received a high number of requests from membership to change the default RAHB Matrix report display setting from “[NEW] REALTOR® Full One Page Report” to “REALTOR® Full”. This change has been implemented and is effective immediately.
The one page report will still be available for printing under the heading “[NEW] REALTOR® Full Printable (One Page)”, but your default view will be the larger-font-sized “REALTOR® Full Report”.
Thanks again for your feedback as we continue to improve and develop the reports in RAHB Matrix!
Dec 12, 2017 | DS, Matrix, MLS®, Stats & Technology |
Did you know that even though RAHB Matrix keeps a history of previous listing open houses, if you want to successfully book an open house, you must enter the date and time as a new open house record?
That’s right: if you want to correctly enter an open house in RAHB Matrix, make sure that you do not amend a previously entered open house, but create a new one. To do so, click on the “More” button at the bottom of your screen under the “Manage Open Houses” section.

You can also delete a past open house by clicking the “Delete” button under the “Manage Open Houses” section.
Once you have submitted your open house, click on the MLS® number that appears on the next screen to confirm that your open house has been booked correctly.
To verify you have taken the proper steps, check your display on the RAHB Matrix “REALTOR® Full” report – your open house details will appear below the photo. If your open house details do not appear on the “REALTOR® Full” report, the open house was entered incorrectly.
Nov 29, 2017 | DS, Matrix, MLS®, Stats & Technology |
After your listing has been submitted live to saved as incomplete in Matrix, you may add photos and/or supplements. To do so, follow the steps below:
1. From the Button Bar, click “Add/Edit Photos” to add listing photos.
2. Click the “Browse” button to locate the listing photos on your hard drive, then drag your cursor over multiple images (or CRTL and click individual images) to select the ones you would like to upload. For best quality, upload photos that are at least 1024 x 768 pixels.
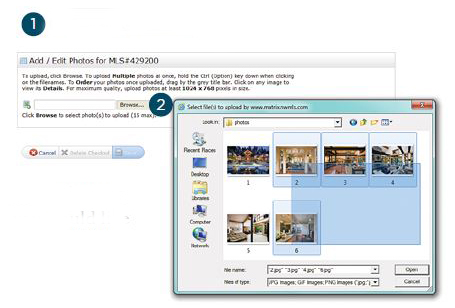
3. Once listing photos have uploaded, click any thumbnail to enlarge the image and add a photo description (optional). Click the “Done” link when finished, followed by “Save” on the button bar. Please note that thumbnails outlined in red indicate that the image dimensions are smaller than recommended.
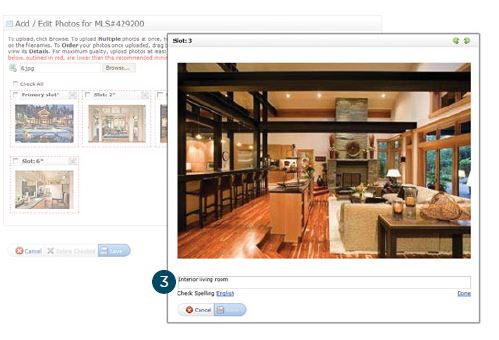
4. Click and drag the thumbnail, “Slot: [#]*] to reorder the photos as you would like them to appear in the listing. Please note that this currently only works in Firefox or Internet Explorer browsers.
5. Click “Saved” when complete.
6. From the Button Bar, click “Add/Edit Supplements” to add listing supplements (also known as “Attachments”).
7. Enter a “Supplement Description”, choose a “Supplement Type”, then click the “Browse” button to locate the listing supplement on your hard drive.
8. Click the “Upload” button to upload this supplement to the listing.
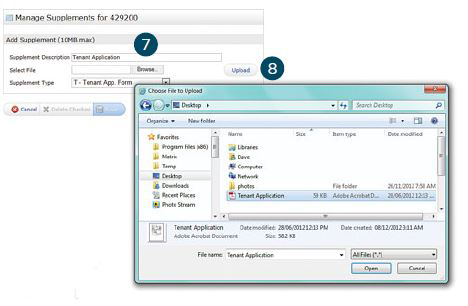
9. Click “Save” when complete.

Nov 29, 2017 | DS, Matrix, MLS®, Stats & Technology |
When completing the new RAHB Property Information Form, be sure to pay special attention to the Photo Instructions field, as certain selections will incur a fee.
You must upload a photo to your listing within two business days of receiving an MLS ® number and/or your listing has become active on the MLS ® system. You can take these photographs yourself, or you can have a photographer take them for you.
If you would like REAL Services Photography to shoot your listing photos, select Front View Only or Front View & Back View under the Photo Instructions field. For one photograph, REAL Services will charge a $20+HST fee.
If you would like to provide your own photographs, select Photo to Follow, Photo Attached or Sketch Attached under the Photo Instructions field. By selecting either of these options, you are indicating that you will provide your own photographs within the next two business days.

Nov 28, 2017 | DS, Matrix, MLS®, Stats & Technology |
When you enter the commission to selling brokerage, be sure to include a dollar sign ($) or percentage sign (%) to indicate what the commission will be. When the commission is noted only as, for instance, “1”, there is no indication whether the selling commission is $1 or 1% of the total commission.
You are reminded that the selling commission can be a percentage of the total commission, a dollar amount or a combination of percentage and dollar amount. You MAY NOT offer “zero” or “0” as the selling commission – according to RAHB’s Rules, “An offer of compensation of zero is not acceptable.” [Section 1, sub-section 1.03(b)(iii)]
Nov 28, 2017 | DS, Matrix, MLS®, Stats & Technology |
Have you noticed the new field called Offer Instructions on RAHB’s new residential and commercial Property Information Forms?
The Offer Instructions field is a free form text field you can use to specify special instructions regarding the submission of offers. Instructions might include things like “Form 244 on file”, “Agreement to be prepared on builder forms”, “email offers to xxxx@xxxx.ca” or the schedules to be attached to an offer. The field will accommodate 170 characters.
When completed, this information will show up on the REALTOR® Full with Signature Report and both the original REALTOR® Full and the NEW REALTOR® Full reports. The information in this field will not be shown on Client displays.
Please note that you may NOT use this field for instructions for “no offers until…”. Continue to use OREA Form 244 Seller’s Direction re Property/Offers for that purpose and disclose all particulars of your seller’s direction in the REALTOR® Remarks field of the listing.
Please ensure your administrative staff is also aware of how to use the Offer Instructions field for your listings.
Nov 21, 2017 | DS, Matrix, MLS®, Stats & Technology |
Q: What value do I put in the “Assessment” field of the Residential Property Information Form?
A: When entering information in the “Assessment” section of the Residential Property Information Form, please ensure that you use the Assessed Value appearing on the Geowarehouse Overview – NOT the amount on the Property Inquiry report from the City of Hamilton, or any Phased-in value.
Assessed Value is determined every four years, and the increase is “phased in” over the following four-year period. Assessed Value is what the City determines the property to actually be worth (usually less than what it sells for), while the Phased-In Value is what is used to determine property taxes for that year (it is done this way so that homeowners don’t get a big spike in property tax every four years).
The “Assessment” field was a required field in the regional Matrix system and was implemented in RAHB Matrix so that we could facilitate data-sharing.
Nov 14, 2017 | Matrix, MLS®, Stats & Technology |
Did you know that if you have broker loading permissions in RAHB Matrix, you can use the “REALTOR® Full with Signature” feature instead of a Property Information Form?
RAHB Matrix has a listing report called the “REALTOR® Full with Signature”. This is a REALTOR® Full report with signature fields, which can be signed by your client, and used in lieu of a Property Information Form. All other forms that comprise the listing (i.e. Listing Agreement, etc.) are still required when using this feature. Using the “REALTOR® Full with Signature” feature can save you from having to do some double data entry.
To use the REALTOR® Full with Signature, follow the steps below:
1. Enter your listing information as you normally would in RAHB Matrix by using the “Input” tab. For information on how to enter listing data, watch this video tutorial outlining how to broker load listings in RAHB Matrix.
2. Once all listing information has been entered, save the listing as “Incomplete” by clicking on the button located at the bottom of the screen.

3. Click on the MLS® number from the “Input Succeeded” screen.

4. From the “Display” menu, choose “REALTOR® Full with Signature”. 5. Click Print!
As always, please contact the RAHB MLS® Department with any further questions. They can be reached on weekdays between 8:30 and 4:30 at (905) 667-4650.
Nov 8, 2017 | DS, Matrix, MLS®, Stats & Technology |
When you enter a listing, be sure to list bathrooms separately, using the bathroom code, instead of including them as room features, such as a master en suite.
Why?
Bathrooms must be listed separately as rooms so Matrix can find the bathroom code to use in its automatic calculation of number of baths.
This is important because when others are searching for listings and include number of baths in their search criteria, your listing may be missed because Matrix couldn’t find all the bathrooms you included in your description. Your listing with three full baths and a half-bath may appear to have only two baths and a half-bath if you included one of the baths in a room description.
If you have called a room a bathroom but do not indicate the number of pieces, that bathroom will also be excluded from the total count. Listings with a total such as Bathrooms 1 (0 + 1) could in reality have three full baths and one half bath and again would not be included in search results looking for three or more bathrooms.
If you have any active listings where the bathrooms do not display properly, we suggest you edit the listings as soon as possible. View the video below to learn how.
Nov 7, 2017 | DS, Matrix, MLS®, Stats & Technology |
When you market your listed property two different ways – for example, as a residential property AND a farm – you must complete the appropriate listing form(s) and enter the listings separately to obtain two separate MLS® numbers.
In addition, you must flag both listings with the other listing’s MLS® number, as shown below in Input:

Previously, in Fusion, you also flagged your multi marketed listings with a “Primary” or “Secondary” flag. These flags ensured that when the status of your listings changed, only one of those listings was recorded in RAHB statistics. However, these fields are not available in Matrix.
Therefore, when you report any of your multi marketed listings Sold Firm, you must CANCEL the remaining active listing.
Should you have any questions concerning multi marketed listings, please call the MLS® Support Desk at 905-667-4650 (8:30 a.m. – 4:30 p.m. weekdays).
Nov 7, 2017 | DS, Matrix, MLS®, Stats & Technology |
1. Right click on your desktop.
2. A small window will open.
3. Hover your mouse over “New” in the small window.
4. Another small window will open.
5. Click “Shortcut”.
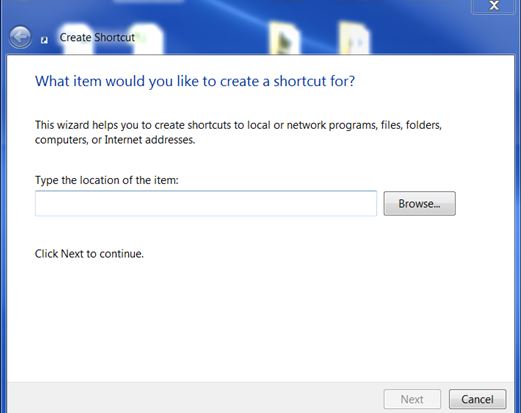
6. A pop-up window will open (see photo example below).
7. Under “Type the location of the item:” enter http://my.rahb.ca
8. Click “Next”.
9. Type in a name for the shortcut.
10. Click “Finish”.
Nov 7, 2017 | Matrix, MLS®, Stats & Technology |
How to Upload Photos in Matrix
1.Click the “Input” tab.
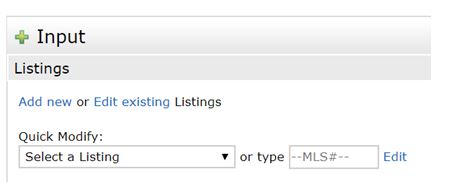
2. Under “Quick Modify” select the listing from the drop down menu.
3. Click “Manage Photos”.
4. Click the “Browse” button and then go to the file your photos are saved in.
5. Click the first photo and then hold down your shift key, and then click the last photo in your file.
6. This will highlight the first, last and all photos in between you wish to upload. (Maximum is 50 photos.)
7. Click “Open”.
8. Your photos will automatically upload.
9. Should you require to change the order, drag and drop your photo in the new order. TIP: If you are using Google Chrome as your browser, zoom out (CTRL -) before dragging your photos.
10. Click the blue “Save” button.
How to Input Virtual Tours in Matrix
1. Click the “Input” tab.
2. Under “Quick Modify” select the listing from the drop down menu.
3. Click “Quick Edit Items – URLs, Map Pin, Remarks” link.
4. Scroll down to the “Additional Links” area.
5. Enter or paste in the URL for your virtual tour in the “unbranded” section.
6. Click the blue “Submit” button.


 5. Click Print!

