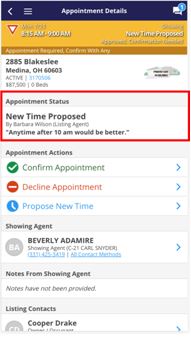
As of Wednesday, September 12, ShowingTime has added a new feature called Accompanied Showings.
This feature allows you to indicate that, for your listing, you (the listing salesperson/broker) must be present for any showings. Also, if you give your client the ability to approve or reject showing requests, you will see the request before it goes to your client. If the showing does not fit into your schedule, you will be able to reject it, and your client will not be made aware of the request.

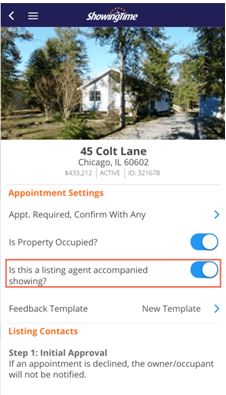
You can configure this new feature on each of your listings by toggling Is this an agent accompanied showing?
Other benefits of this feature include:
- Approval by the listing salesperson/broker will be tracked
- While sellers or occupants are required for accompanied showings, the order of calls is clearly identified on the listing worksheet.
Configuring Contacts for Listing Agent Accompanied Showings
As a listing salesperson or broker who typically accompanies the showing salesperson/broker on all appointments, you may want to see an appointment request before your sellers do, to make sure it works with your schedule. Or, you may want to allow a seller to approve an appointment before the occupant sees the request. You can configure the listing for both of these situations.
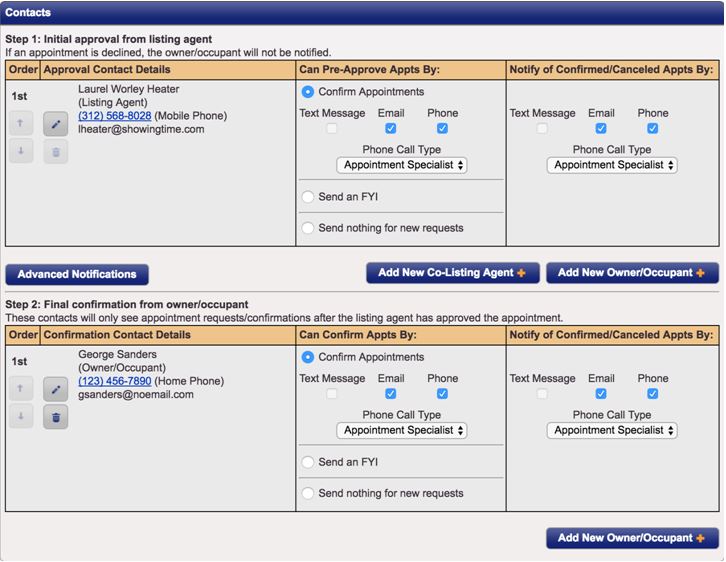
Step 1: Initial approval from listing salesperson/broker
These contacts will be notified of the appointment request before the final confirmation contacts. If the request is not approved by these contacts, the final confirmation contacts will not be notified of the request.
Step 2: Final confirmation from owner/occupant
These contacts will be able to give final confirmation on appointment requests after it has been approved by the initial contacts.
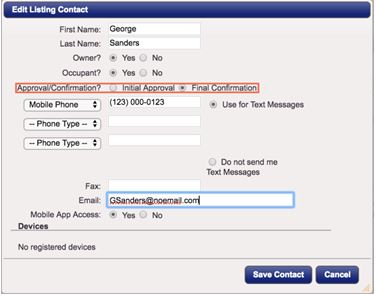
You can also choose to set this preference for the initial contact for showing requests and final confirmation while creating or editing the seller’s contact information.
Scheduling on Behalf of Another Agent
As a listing salesperson or broker scheduling on behalf of showing salesperson or broker on your listing, you can select Approved or Approved and Confirmed for the appointment status. If you choose to Approve only, your seller or occupant will have the chance to confirm or decline the appointment request.
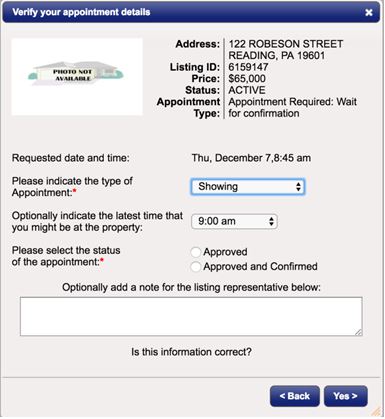
Appointment Details for Listing Agent Accompanied Showings
The Appointment Details screen will indicate that an approval email is sent to the appropriate party.
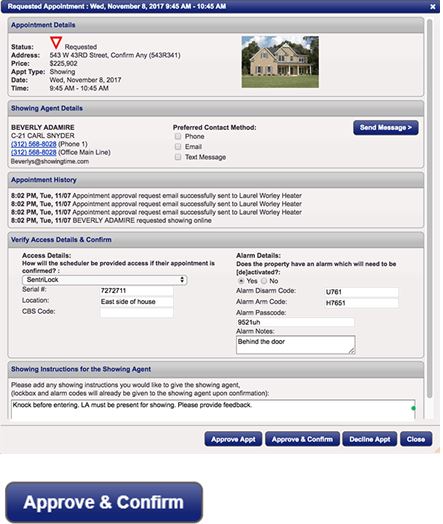
You can click the Approve & Confirm button to automatically approve the appointment and confirm it for the owners or occupants.
Accompanied Showings on Mobile
Scheduling and approving showings works the same way on mobile:
From the Listing page in the app, you can toggle the setting for Is this a listing agent accompanied showing?
You can choose who receives the Initial Approval and Final Confirmation.
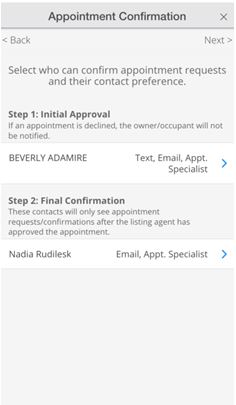
You are also able to change the contact order and choose notification methods.
Approve & Confirm Appointment
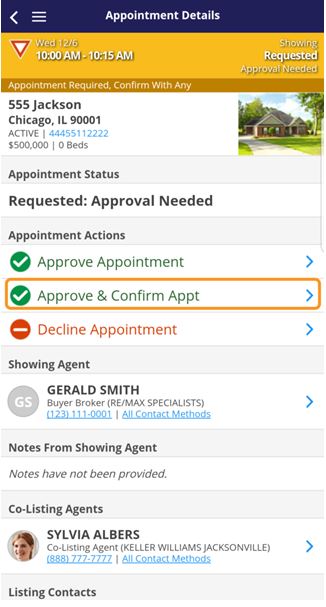
From the ShowingTime App
Step 1
From the app, choose Showings On My Listings, locate the showing and choose Approve and Confirm.
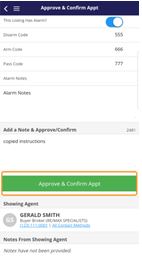
Step 2
Verify any notes and/or access details and click Approve & Confirm Appt.
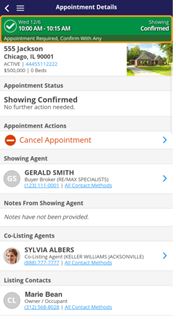
Step 3
The appointment is now confirmed. The showing salesperson/broker will receive the relevant information.
Approve
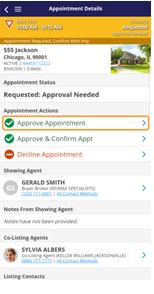
Step 1
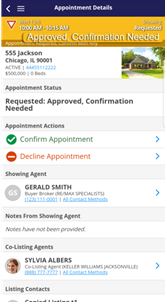
From the app, choose Showings On My Listings, locate the showing and choose Approve.
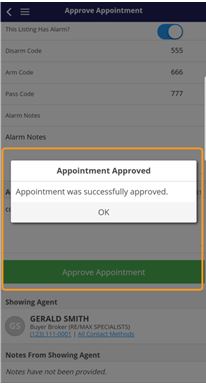
Step 2
Verify any notes and/or access details and click Approve Appointment.
Step 3
The Seller or other Final Confirmation contact will be able to approve or deny the showing.
Proposing New Times
Life is hectic and schedules will inevitably change, resulting in an appointments that need to be changed or declined.
Declining an appointment altogether can lengthen the process of selling a home and may frustrate the buyer. However, moving the appointment back by 30 minutes or later in the day can benefit the seller and perhaps be a better time for the buyer. From the Appointment Details screen, you are able to Confirm, Cancel, and Propose a New Time.
From the Desktop
Step 1
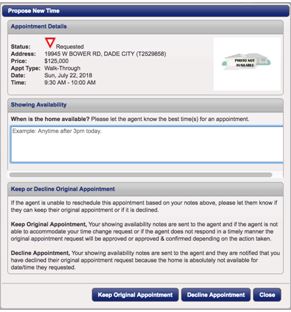
Open the Requested Appointment dialogue and click on the Propose New Time button.
![]()
Step 2
Enter any comments for the suggested new time and choose to cancel or keep the existing appointment.
Step 3
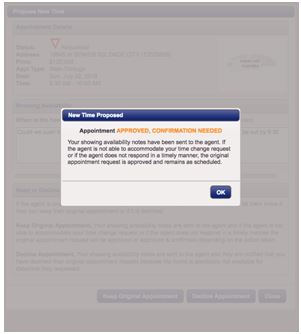
Should you choose to keep the original time, you will see the information above.
Step 4
The appointment will Show as Requested – New Time Proposed. The showing agent will see your comments and choose the next steps.

From the ShowingTime App
Step 1
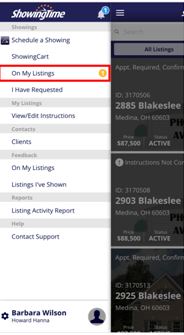
Choose On My Listings from the menu.
Step 2
Select the appointment.

Step 3
Select Propose New Time.
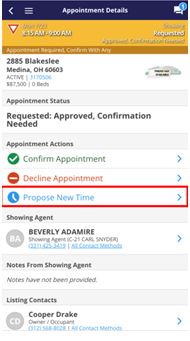
Step 4
Suggest the new time and choose either Keep the Original Appointment, or Decline the Appointment.
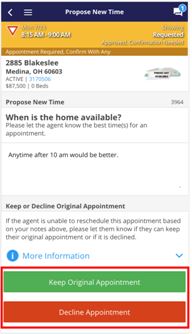
Step 5
You will be notified that the appointment is approved, but confirmation is still needed. The showing agent will need to choose which actions to take next.
